Pulling the Unified Audit Log
During a Business Email Compromise (BEC) investigation, one of the most valuable logs is the Unified Audit Log (UAL). This log provides a comprehensive record of user and admin activities across various Microsoft 365 services. These logs are essential for monitoring, compliance, and conducting forensic investigations. There are two ways to collect them: via the Microsoft Purview Audit Tab and PowerShell.
Permissions
Historically, permissions for pulling logs differed between the Audit tab and PowerShell. You needed Global Admin privileges to pull data via PowerShell, whereas in Microsoft Purview, you only needed Security Reader Permissions along with the Audit Log role. Now, the minimum permission level required to pull the Unified Audit Log from either the Audit tab or PowerShell is the “View Only Audit Logs” or “Audit Logs” role. This change, implemented in November 2023, aims to simplify the management of audit permissions, adhering to the principle of least privilege.
Microsoft Purview – Audit
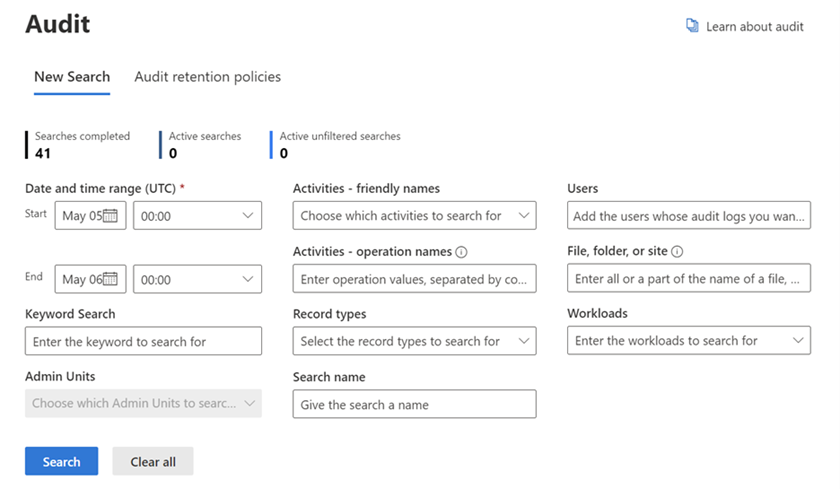
To access the Audit tab, navigate to Microsoft Purview Audit or log in to security.microsoft.com and select the Audit tab on the left-hand side. Once on the Audit page, you can search the entire tenant for different UAL activities.

Although this post doesn’t detail each log filter, you can filter by user, date, activities, keywords, and specific sites visited. The Audit tab in Microsoft Purview offers a user-friendly interface, making it accessible to varying levels of technical personnel. The drop-down menus and activity filters allow users to pull up to ten different Unified Audit Logs simultaneously.
However, there are limitations to using the Audit tab. For large datasets or complex searches, performance may be slower compared to shorter or more granular searches. Additionally, users are limited to pre-built templates during report generation.
PowerShell
To search unified audit logs via PowerShell, you need the Exchange Online Management module. This module allows access to the audit logs and various operations. Follow these steps to search unified audit logs via PowerShell:
Prerequisites
- Install the Exchange Online Management Module:
- Open PowerShell as an administrator.
- Install the module (if not already installed):
Install-Module -Name ExchangeOnlineManagement -Force -AllowClobber
Connect to Exchange Online:
- Connect using an account with the necessary permissions:
Import-Module ExchangeOnlineManagement
Connect-ExchangeOnline -UserPrincipalName [email protected]
Steps to Search Unified Audit Logs
- Define the Search Parameters:
- Specify parameters like start and end dates, users, and operations of interest.
- Specify parameters like start and end dates, users, and operations of interest.
- Use the Search-UnifiedAuditLog Cmdlet:
- Example command 1:
$startDate = (Get-Date).AddDays(-30)
$endDate = Get-Date
$auditLogs = Search-UnifiedAuditLog -StartDate $startDate -EndDate $endDate -RecordType
Exchange, SharePoint, OneDrive, Teams -Operations Send, FileAccessed, UserLoggedIn –
ResultSize
5000
This query sets a date range for the past 30 days starting from today and searches the unified audit log for activities in Exchange, SharePoint, OneDrive, and Teams. It targets the specific operations: Send, FileAccessed, and UserLoggedIn, and limits results to 5000 records.
- Example command 2:
$startDate = (Get-Date).AddDays(-30)
$endDate = Get-Date
$auditLogs = Search-UnifiedAuditLog -StartDate $startDate -EndDate $endDate -RecordType
Exchange -Operations New-InboxRule, Set-InboxRule, Remove-InboxRule -ResultSize 5000
This query sets a date range for the past 30 days starting from today and searches the unified audit log for Exchange activities. It targets the specific operations: New-InboxRule, Set-InboxRule, and Remove-InboxRule, and limits results to 5000 records.
3. Export the Results:
- Export results to a CSV file for further analysis:
$auditLogs | Export-Csv -Path “C:\path\to\your\auditlog.csv” -NoTypeInformation
This query exports the audit logs to a CSV file at the specified path without including the type of object being exported in the header of the CSV file (This results in a cleaner CSV file that only contains the data). PowerShell allows analysts to perform commands to retrieve data similarly to using the filters in the Audit tab but with more customization and scalability for large datasets. Multiple command prompts can be opened for simultaneous searching, though by default, a maximum of three concurrent PowerShell sessions are allowed.
Audit Tab or PowerShell?
Which method is better? It depends on the situation. Both have their advantages and disadvantages. Analysts should be familiar with both methods. Even knowing basic PowerShell queries is beneficial for situations where the Audit tab may not suffice. Stay tuned for future posts where we’ll delve into a variety of customizations for these queries and explore other logs available in ExchangeOnline and Azure via PowerShell. There’s much more to uncover, so don’t miss out!
RESOURCE CATEGORIES
- Buyer's Guides(1)
- Consumer Education(39)
- Consumer Stories(2)
- Cybersecurity Consulting(4)
- Data Breaches(15)
- Data Privacy(43)
- Incident Response(2)
- Interview(51)
- MDR Services(59)
- MobileSOC(6)
- News(5)
- Press Release(101)
- Research Report(9)
- Security Assessments(2)
- Thought Leadership(19)
- Threat Hunting(3)
- Video(1)
- Vulnerability Disclosure(1)
