Weaponizing Public Breach Data Dumps for Red Teamers
Public password dumps have been an excellent way for attackers to gain access to accounts. Whether through credential stuffing or utilizing the emails and passwords directly, these dumps are a treasure trove of information. One thing red teamers and malicious actors alike can always count on is that the average user will likely reuse one password across multiple accounts. If not the exact same, modified versions of the breached passwords can be extrapolated to provide some solid candidates to test.
One of the biggest problems for our team has been how to effectively implement a method to make password dumps actionable during engagements. Sure, you can grep for an organization’s domain in a directory of files, but a comprehensive collection of breach dumps can grow to terabytes of storage. Then how can we effectively store and search through these data dumps in a timely fashion?
For this task, I previously considered a traditional SQL database, but could never achieve the results I wanted with minimal configuration. I found success utilizing the open-source log management platform Graylog built with Elasticsearch.
To address these issues, this blog post includes:
- Hardware specs to store and search effectively
- Graylog installation and configuration
- Creating input and extractor rules
- Creating indexes and streams to organize ingested data
Hardware Specifications:
My setup consisted of an HP Proliant DL380 G7 that I picked up from craigslist a couple of years ago with the following specs:
- 2 x 2 TB hard drives in a raid 0 (not redundant I know)
- 128GB of RAM
- 2 X 6 Core Intel Xeon X5680 (24 logical cores)
These specs allow plenty of space for storing 100GB+ dump files, as well as allowing Elasticsearch and Graylog plenty of memory and cores for caching operations, processing, etc.
Graylog Installation and Configuration:
For the initial installation of Graylog, I used the following guide for Ubuntu: https://www.rosehosting.com/blog/how-to-install-and-configure-graylog-server-on-ubuntu-16-04/
Having completed that, I tweaked a few things to help with the log ingestion.
1. First, increased the Disk Journal size to allow Graylog to temporarily store bulk messages on the file system before being written to Elasticsearch. This helps messages not being dropped or overwritten during ingestion. To do this we will edit line 478 in the file. Mine is set to 100GB max. Make sure you take into account how much storage you have and an estimate on how big your lists are for the proper sizing:
/etc/graylog/server/server.conf474 # Journal hold messages before they could be written to Elasticsearch.
475 # For a maximum of 12 hours or 5 GB whichever happens first.
476 # During normal operation the journal will be smaller.
477 message_journal_max_age = 24h
478 message_journal_max_size = 100GB2. Next, we are going to increase our Graylog and Elasticsearch JVM heap settings. There is a great video that explains the differences and steps here. I currently have my Graylog JVM heap set to 20GB maximum, this configuration is located at line 5 of the file:
/etc/default/graylog-serverGRAYLOG_SERVER_JAVA_OPTS="-Xms4g -Xmx20g -XX:NewRatio=1 -server -XX:+ResizeTLAB -XX:+UseConcMarkSweepGC -XX:+CMSConcurrentMTEnabled -XX:+CMSClassUnloadingEnabled -XX:+UseParNew GC -XX:-OmitStackTraceInFastThrow”I have also configured the Elasticsearch settings with the minimum heap size set to 20GB and the maximum to 60GB. This change is made on lines 22 and 23 of the file:
/etc/elasticsearch/jvm.options19 # Xms represents the initial size of total heap space
20 # Xmx represents the maximum size of total heap space
21
22 -Xms20g
23 -Xmx60g3. The last relevant configuration is the number of processor cores allowed for output and process buffers. I have 8 assigned to both on line 419 and 420 in the file:
/etc/graylog/server/server.conf417 # The number of parallel running processors.
418 # Raise this number if your buffers are filling up.
419 processbuffer_processors = 8
420 outpustbuffer_processors = 8Once all these changes are made, restart the Graylog and Elasticsearch services by running the following to apply the new changes:
service graylog-server restart
service elasticsearch restart
This should wrap it up for the configs. It is worth noting that you should tweak most of these settings to match the amount of available system hardware. As well as the expected amount of data in your dump lists.
Creating Inputs and Extractor Rules
With our configurations completed, it is time to prepare Graylog to ingest the dump data that we will send later in this tutorial.
1. First, we will start a Raw/Plaintext TCP You can do this by logging into the web interface and navigating to “System/Inputs” → “Inputs”
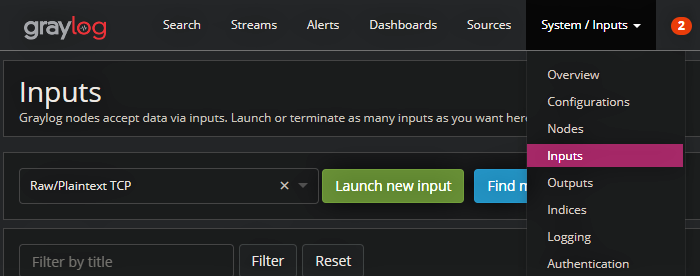
2. From there select “RawPlaintext TCP” → “Launch new input”. You will see a configuration window appear.
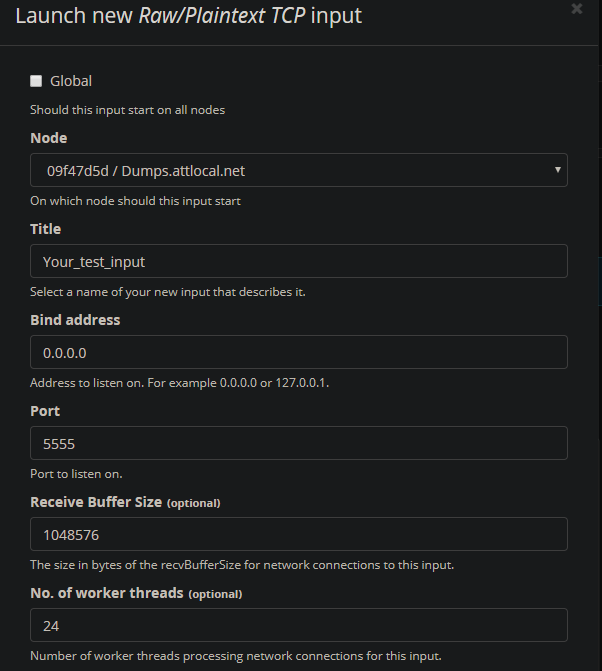
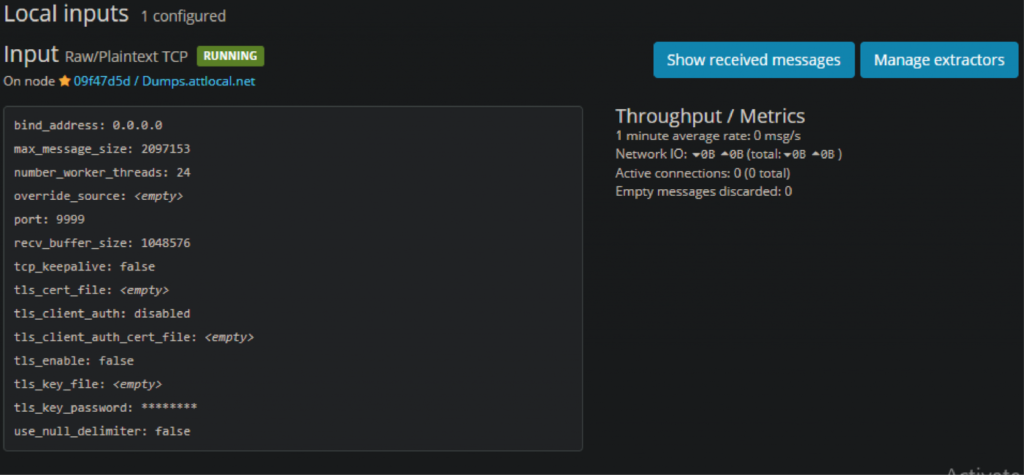
3. Select whatever node is available and assign it a name. Scroll down and select “Save”. You should see the new input.
4. Last, send yourself a test message with the following command:
echo "[email protected]:test123" | nc 127.0.0.1 9999Then select “Show Received messages” on the input. If you see your first test message, congrats!
Now we’ll configure an Extractor on this input. This will allow Graylog to extract out the Email and Password fields to store into Elasticsearch to search later. In order to build an extractor, we need to know the format of the incoming data. The format that I came up with was Email: Password just like the test message above. I felt this format was straightforward and would not be too difficult to parse from the existing lists that I had acquired.
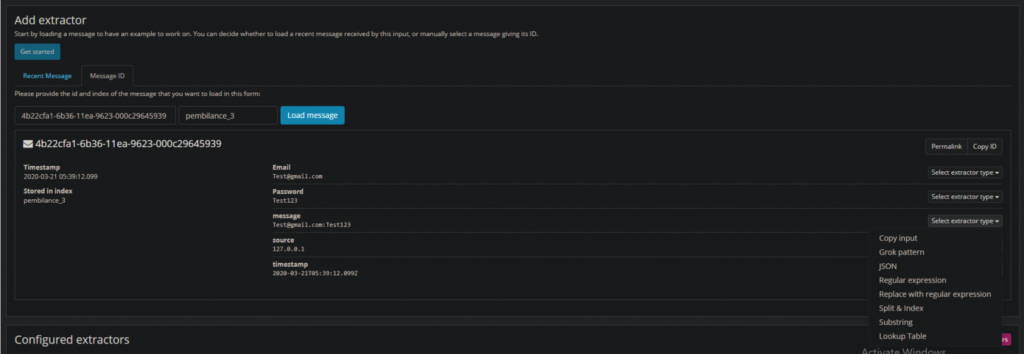
1. First, select “Manage Extractors” from the input you just created.
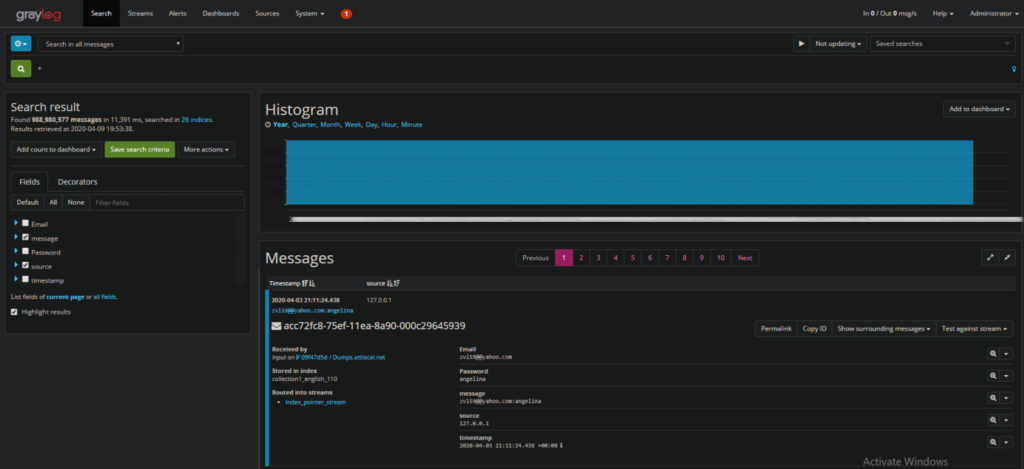
2. Then click “Get Started” in the top left, and then “Load Message”. You should be presented with a test message. If one cannot be located go to “search” → “search all messages” → “*”. That should present all your current messages, and you can select an index an ID from there.
3. Now that we have our test message, let’s create our extractor on the message field. Select “Message” → “Regular expression”
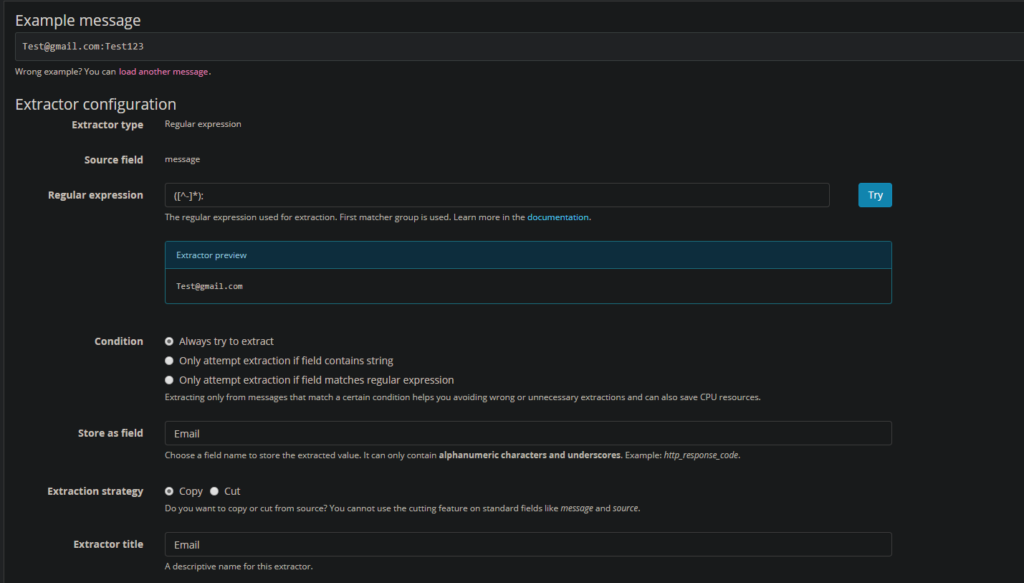
4. Now we will extract the email field with the following regex: ([^-]*). Label the extractor “Email” and the field “Email”:
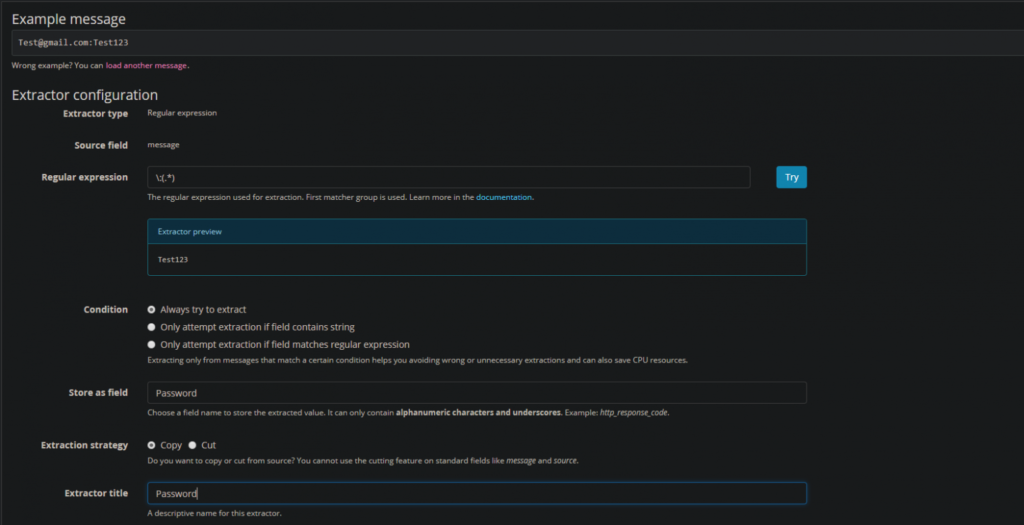
5. Next, we’ll extract the Password field use the exact same process for creating an extractor, but use the following regex:
\:(.*)As well as labeling the extractor “Password” and the Field “Password”
This should wrap it up for extractors. One thing to note is you can create any extractor for any type of message so feel free to create something that would follow your data format more effectively. You could stop here and begin ingesting messages and be just fine. However, depending on how many dumps lists you plan to acquire, you may want to separate bulk messages into individual indexes.
Creating Indexes and Streams
The last thing we are going to do is begin creating indexes to organize our dump lists. For this example, I will create an index to represent some of the information in the Collection1 data dump and create a stream to route our messages to this index. I would recommend giving the Graylog documentation a once over here.
1. First, navigate to “System/Indices” → “Create Index Set”

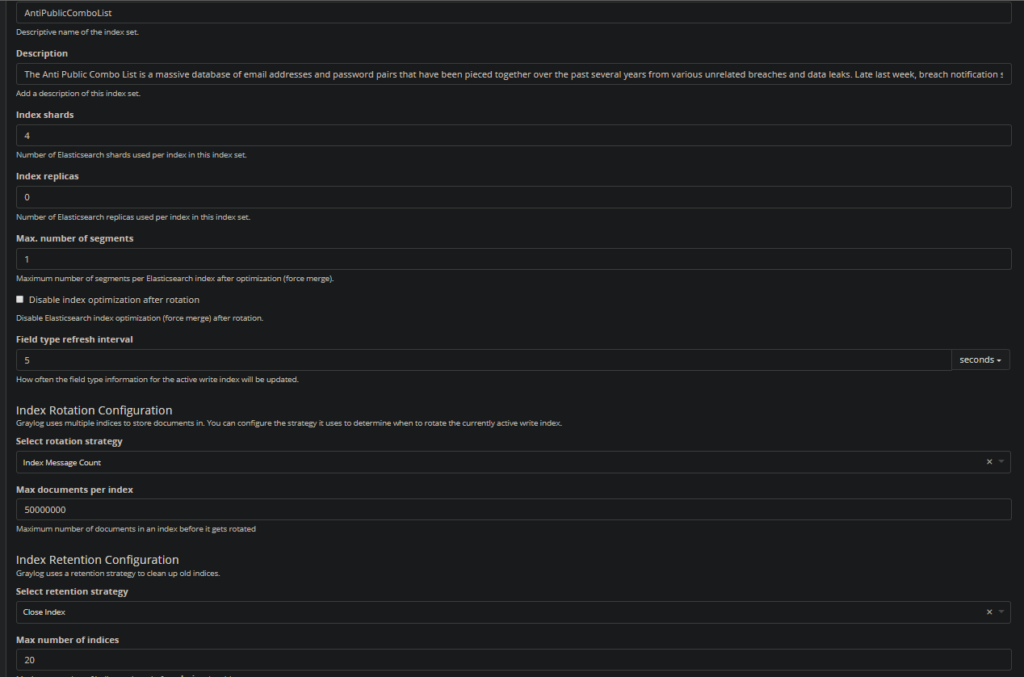
You should see a window with all your index options ready to be set. I usually set mine to never expire.
Title: <Whatever dump you are ingesting>
Description: <A paragraph of where the dump came from>
Max documents per index: 50000000
Max Number of indices: 20
Retention Strategy: Close
Create an index for each dump source to keep them organized. I currently have 5 indexes for each dump list I have acquired.
2. We will then create a stream to move messages into the index you just created. Once we do this the overall flow will look as follows:
Message → Inputs → Extractor rules → Stream → IndexNavigate to “Streams” → “Create Stream”
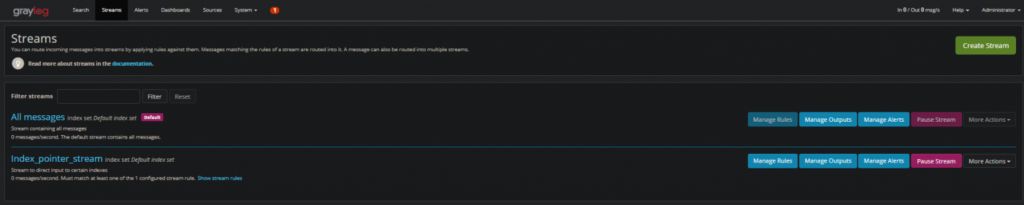
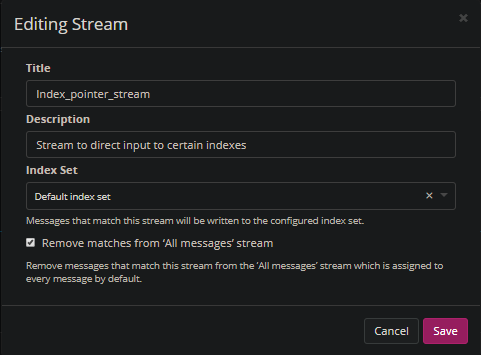
3. Lastly set the “Index Set” to the index you want to write to. Make sure to change this each time you create a new index for a new list.
And you are done! You should be ready to parse, ingest, and search all your dump data. Following is a bash script I created to help ingest multiple files:
1 | #!/bin/bash |
2 | FILES=/root/Desktop/Dumps/Collection1/Collection_1_mail_access_1/* |
3 | <strong>for</strong> f <strong>in</strong> $FILES |
4 | <strong>do</strong> |
5 | echo "Deduping $f" |
6 | #take action on each file. $f store current file name |
7 | sort $f | uniq | pv --quiet --rate-limit 600000 | nc 127.0.0.1 9999 |
In summary, my Graylog setup currently has ~1 Billion messages so far and has pretty good performance when searching for and individual Email/Domain. I have a ton of lists still needing to crack, format, and ingest so there will be more to come.
Lastly, I am not a Graylog expert by any means. Any recommendations to increase search or ingest speed would be appreciated!
Reference Links:
https://www.rosehosting.com/blog/how-to-install-and-configure-graylog-server-on-ubuntu-16-04/
https://community.graylog.org/t/graylog-journal-file-system-capacity/6368
https://www.graylog.org/videos/java-heap
https://docs.graylog.org/en/3.2/pages/extractors.html
https://www.troyhunt.com/the-773-million-record-collection-1-data-reach/
https://docs.graylog.org/en/3.2/pages/configuration/index_model.html
Author: Sean Moore | Adversarial Analyst, TEAMARES at CRITICALSTART | @Sean_Zer00

You may also be interested in…
RESOURCE CATEGORIES
- Buyer's Guides(1)
- Consumer Education(39)
- Consumer Stories(2)
- Cybersecurity Consulting(4)
- Data Breaches(15)
- Data Privacy(43)
- Incident Response(2)
- Interview(51)
- MDR Services(59)
- MobileSOC(6)
- News(5)
- Press Release(101)
- Research Report(9)
- Security Assessments(2)
- Thought Leadership(19)
- Threat Hunting(3)
- Video(1)
- Vulnerability Disclosure(1)